Cooking In Stilettos...
Thursday, January 29, 2009
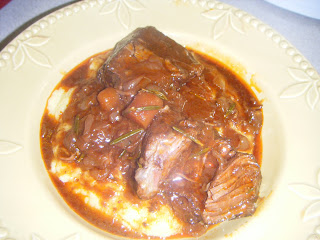
Tried & True: Williams Sonoma Braised Short Ribs
 In November, I fell in love - with short ribs - specifically, the Bourbon Blue's Braised Short Ribs.
However, I couldn't necessarily stalk pester their chef for the recipe so this gal had to improvise. And by improvise, I mean review every little recipe I could get my hands on that might be *the one*.
Well, my friends, I think I found one that is striking similar and, even better, I was able to finally use that lovely crock pot that only sees the counter every few months when I have to make those fabulous meatballs for a soiree.
Trust me when I say that while it make take some time, the end result is WELL worth it. I served it over some Asiago polenta (the cupboard was sans Parmesan - I KNOW - bad, Lys, bad!) and the leftovers were even better the next day. I halved the recipe because, unless I was feeding my friends for a week, this wouldn't work and I'd have short ribs for breakfast lunch and dinner. Now that I think about it - really, what's so bad about that...
~~~~~~~~~~~~~~~~~~~~~~~~~~~~~~~~~~~~~~~~~~~~~~~~~~~~
Williams-Sonoma Braised Short Ribs
Recipe courtesy of Williams-Sonoma
Ingredients:
4 lb. bone-in beef short ribs
Salt and freshly ground pepper, to taste
2 cups all-purpose flour
3 Tbs. olive oil, plus more as needed
2 large yellow onions, chopped
3 large carrots, peeled and cut into 1-inch chunks
4 garlic cloves, chopped
1 bottle (750ml) full-bodied red wine
1 can (6 oz.) tomato paste
3 fresh thyme sprigs
2 fresh rosemary sprigs
1 bay leaf
1 to 2 cups beef stock
Directions:
Season the short ribs with salt and pepper.
Spread the flour out on a rimmed baking sheet.
Dredge the ribs in the flour, shaking off the excess.
In a Dutch oven over medium-high heat, warm the 3 Tbs. olive oil until nearly smoking.
Working in batches, brown the ribs on all sides, about 10 minutes total.
Transfer to a slow cooker.
Add more oil to the Dutch oven if needed.
Reduce the heat to medium, add the onions, carrots and garlic and cook, stirring occasionally, until soft, about 10 minutes.
Transfer to the slow cooker.
Add the wine to the Dutch oven and cook, stirring to scrape up the browned bits.
Add the tomato paste, thyme, rosemary and bay leaf, mashing any large chunks of tomato paste with a spoon.
Increase the heat to medium-high and cook until thickened and reduced by half, 8 to 10 minutes.
Add the wine mixture to the slow cooker along with enough stock to come halfway up the sides of the ribs.
Cover and cook on high for 6 hours according to the manufacturer’s instructions, stirring occasionally.
Skim the fat off the sauce.
Discard the herb sprigs and bay leaf.
Transfer the ribs, carrots and sauce to shallow bowls or plates and serve immediately.
Serves 6.
Labels: Entree, Recipe, Tried and True, Williams-Sonoma
Posted by Lys ::
7:54 PM ::
4 comments


Post / Read Comments
---------------oOo---------------
Monday, January 19, 2009
Tried and True: Onion Soup with Thyme and Fontina...
My mom taught me an appreciation of French Onion soup when I was younger. As I got older, I always thought that French Onion soup was daunting and who am I to attempt and resigned to only order it when I was out for dinner.
That was until I was watching Everyday Italian and Giada de Laurentiis made her Onion Soup with Thyme and Fontina. It was like the beloved French Onion but kicked up Italian style. And, it wasn't as complicated as my mind tended to think. Even I could do this!
This soup is in my arsenal. It's super easy to make, always garners compliments galore and is comfort food that is perfect for these cold winter months.
Enjoy!
~~~~~~~~~~~~~~~~~~~~~~~~~~~~~~~~~~~~~
Recipe courtesy of Giada de Laurentiis and FoodNetwork.com
Ingredients
3 tablespoons olive oil
2 large Vidalia onions, sliced
1/2 teaspoon kosher salt
1/2 teaspoon freshly ground black pepper
1 teaspoon fresh thyme leaves
4 cups beef broth
4 slices ciabatta bread, cubed
4 ounces sliced fontina cheese
Special equipment: 4 (1 1/2-cup) ovenproof ramekins
Directions
In a medium, heavy saucepan, heat the olive oil over medium heat. Add the onions, salt, and pepper. Cook, stirring occasionally, until the onions are tender, about 10 minutes. Add the thyme and broth. Simmer, uncovered, until the onions are soft, about 15 minutes.
Divide the soup between the 4 ovenproof ramekins. Divide the cubed bread among the ramekins. Top each with slices of fontina cheese. Place under the broiler, until the cheese is golden and bubbly, about 4 minutes. Serve immediately.Labels: Food Network, Giada de Laurentiis, Recipe, Soup, Tried and True
Posted by Lys ::
11:17 AM ::
1 comments
Post / Read Comments
---------------oOo---------------
Wednesday, January 7, 2009
Tried and True: Rachael Ray's "You Won't Be Single For Long Vodka Pasta"
I know, I know - flog me now. I'm recommending a RR Recipe. However, I have to say, this vodka pasta is super simple, flavorful and just straight out rocks. Now, I know you are all going "Lys, you made it and you're single. The title says won't be single for long. What's up with that?" Quite simply, I have never used it on a special guy - just my friends and fam. However, if I did whip out this recipe for a certain someone, trust me, it would make him cry tears of contented happiness.
This recipe is one that you can put in your arsenal and don't worry, I won't tell anyone that it's courtesy of Rachael Ray. It will be our little secret.
~~~~~~~~~~~~~~~~~~~~~~~~~~~~~~~~~~~~~~
Recipe courtesy of FoodNetwork.com and Rachael Ray
Ingredients
1 tablespoon extra-virgin olive oil, once around the pan in a slow stream
1 tablespoon butter
2 cloves garlic, minced
2 shallots, minced
1 cup vodka
1 cup chicken stock
1 can crushed tomatoes (32 ounces)
Coarse salt and pepper
16 ounces pasta, such as penne rigate
1/2 cup heavy cream
20 leaves fresh basil, shredded or torn
Crusty bread, for passing
- Heat a large skillet over moderate heat. Add oil, butter, garlic, and shallots. Gently saute shallots for 3 to 5 minutes to develop their sweetness. Add vodka to the pan, 3 turns around the pan in a steady stream will equal about 1 cup. Reduce vodka by half, this will take 2 or 3 minutes. Add chicken stock, tomatoes. Bring sauce to a bubble and reduce heat to simmer. Season with salt and pepper.
- While sauce simmers, cook pasta in salted boiling water until cooked to al dente (with a bite to it). While pasta cooks, prepare your salad or other side dishes.
- Stir cream into sauce. When sauce returns to a bubble, remove it from heat. Drain pasta.
- Toss hot pasta with sauce and basil leaves.
- Pass pasta with crusty bread.
Labels: Food Network, Italian, Rachael Ray, Recipe, Tried and True
Posted by Lys ::
9:07 PM ::
1 comments
Post / Read Comments
---------------oOo---------------
Sunday, January 4, 2009
Tried and True: Barefoot Contessa's Herb-Roasted Turkey Breast...
For the holiday this year, I decided to keep it simple and didn't freak out making a whole turkey but just a good size turkey breast. When it came to doing research as to the *right* recipe to try, I thought "Barefoot Contessa - one can't go wrong with a Barefoot Contessa recipe" and I'm glad I went with that idea.
Granted, there were a couple things I would change, like buy fresh thyme as the store was out and I substituted dried but it was a wee bit more than I should have used but the turkey came out moist, flavorful and perfect not only for dinner but also for leftovers.
 Preppin' for the initial rub
I would highly recommend making this when you are looking to keep it small but somewhat traditional.
********************************************************
Recipe courtesy of Barefoot Contessa and Food Network
Ingredients
1 whole bone-in turkey breast, 6 1/2 to 7 pounds
1 tablespoon minced garlic (3 cloves)
2 teaspoons dry mustard
1 tablespoon chopped fresh rosemary leaves
1 tablespoon chopped fresh sage leaves
1 teaspoon chopped fresh thyme leaves
2 teaspoons kosher salt
1 teaspoon freshly ground black pepper
2 tablespoons good olive oil
2 tablespoons freshly squeezed lemon juice
1 cup dry white wine
Preheat the oven to 325 degrees F. Place the turkey breast, skin side up, on a rack in a roasting pan.
In a small bowl, combine the garlic, mustard, herbs, salt, pepper, olive oil, and lemon juice to make a paste. Loosen the skin from the meat gently with your fingers and smear half of the paste directly on the meat. Spread the remaining paste evenly on the skin. Pour the wine into the bottom of the roasting pan.
Roast the turkey for 1 3/4 to 2 hours, until the skin is golden brown and an instant-read thermometer registers 165 degrees F when inserted into the thickest and meatiest areas of the breast. (I test in several places.) If the skin is over-browning, cover the breast loosely with aluminum foil. When the turkey is done, cover with foil and allow it to rest at room temperature for 15 minutes. Slice and serve with the pan juices spooned over the turkey.
********************************************************
Viola - the finished product

Labels: Barefoot Contessa, Holiday, Recipe, Tried and True
Posted by Lys ::
3:40 PM ::
4 comments
Post / Read Comments
---------------oOo---------------
Wednesday, August 13, 2008
Tried & True: Giada's Chicken or Steak with Balsamic BBQ Sauce
 This is one of those recipes I go to when I want to put a little oomph in my step. Now, this in NO way means I'm abandoning my fave Barefoot Contessa BBQ Sauce, but this is good for when you want a little somethin' different.
 ~~~~~~~~~~~~~~~~~~~~~~~~~~~~~~~~~~~~~~~~~~~~~~~~~~~~~~~~~~~
Chicken or Steak with Balsamic BBQ Sauce
Recipe and Photo courtesy of Giada de Laurentiis; Food Network.com
For the Balsamic BBQ sauce:
1 cup balsamic vinegar
3/4 cup ketchup
1/3 cup brown sugar
1 garlic clove, minced
1 tablespoon Worcestershire sauce
1 tablespoon Dijon mustard
1/2 teaspoon salt
1/2 teaspoon freshly ground black pepper
For the chicken or steak:
4 pieces chicken (any combination of breast or leg-and-thigh pieces) or 4 pieces of New York strip or Club strip steak
Salt and freshly ground pepper
For the BBQ sauce:
Combine all the ingredients in a small saucepan and stir until all the ingredients are incorporated and the mixture is smooth. Simmer over medium heat until reduced by 1/3, about 15 to 20 minutes.
For the chicken or steak:
- Place a grill pan over medium heat or preheat a gas or charcoal grill.
- Season the meat with salt and pepper.
- Lightly coat with some of the BBQ sauce using a pastry brush. Place the meat on the grill.
- Place the remaining BBQ sauce, still in the small saucepan, over low heat or on the edge of a gas or charcoal grill and allow to gently simmer while the meat cooks.
- Cook the chicken about 8 minutes per side.
- Cook the steaks starting at about 4 minutes per side until a meat thermometer reads the desired temperature, 120 degrees F for medium rare, 135 degrees F for medium (about 6 minutes per side), 155 degrees F for well done (about 9 minutes per side).
- Continually brush the meat with BBQ sauce every few minutes.
- Remove the meat from the grill and let rest for at least 5 minutes.
- Serve with the heated BBQ sauce alongside.
Alternately, the chicken can be baked in the oven.
- Preheat the oven to 375 degrees F.
- Place the chicken skin side up in a baking dish and bake for 25 minutes.
- Remove the baking dish from the oven and spoon the BBQ sauce all over the top of the chicken.
- Return the baking dish to the oven and bake for another 15 minutes.
Labels: Food Network, FoodBuzz, Giada de Laurentiis, Recipe, Tried and True
Posted by Lys ::
5:55 PM ::
1 comments
Post / Read Comments
---------------oOo---------------
Saturday, August 2, 2008
Cooks Illustrated & America's Test Kitchen...
FYI- you are hereby on notice. I read this post and am OUTRAGED at your representative's behavior, condescending tone and superiority complex. As I deal with IP law quite often, for your representative to act like this is just horrid - over a modified potato salad recipe.
That being said, Cooks Kitchen and America's Test Kitchen - we're breaking up. I'm not buying your magazine or frequenting your websites. Your emails will be deleted. Conde Nast will get my attention from here on out. You have lost a loyal reader.
Foodie Bloggers, check this post out and register your comments if this is something that gets your goat. Melissa should have NEVER gone through this drama. Much thanks to Don for the heads up.Labels: Guilty of Idiocy, Random Mess, Recipe
Posted by Lys ::
8:00 PM ::
3 comments
Post / Read Comments
---------------oOo---------------
Tuesday, July 22, 2008
Perfect For A Sunday Brunch: Soufflé Blueberry Pancakes
 In this week's Cuisine Beyond segment of the Bed, Bath & Beyond newsletter, Chef Ryan Scott has a fabulous recipe that merits a second look: Soufflé Blueberry Pancakes with Blueberry Cream Topping.
 I have to say, I am NOT a fan of pancakes due to trauma endured at one Catholic school that only served pancakes every. single. Wednesday. To boot, they were the worst pancakes imaginable and to have school lunch of cardboard pancakes. Blech!
Rule of thumb is that I normally don't enjoy pancakes unless they are blueberry (because, of course, my Bampa made the *best* blueberry pancakes, ever) or corn fritters (also kudos to the Bamps for that one).
If you try it, let us know how it works out.
~~~~~~~~~~~~~~~~~~~~~~~~~~~~~~~~~~~~~~~~~~~~~~~~~~~~~~~~~~~~~~~~~~~~~~~~~~
Soufflé Blueberry Pancakes with Blueberry Cream Topping
(Recipe & Photo courtesy of Chef Ryan Scott & Bed Bath & Beyond)
Pancakes
Ingredients:
1 1/4 cups all-purpose flour
1 1/4 cups cake flour
1/2 teaspoon baking soda
2 tablespoons baking powder
2 tablespoons sugar
1 teaspoon salt
6 tablespoons unsalted butter, melted
2 1/2 cups buttermilk
1/4 cup milk
1 teaspoon vanilla extract
1 pint of blueberries
Preparation:
Place all the dry ingredients together in one bowl and mix well. In another bowl, add the melted butter to the egg yolks and mix well, then slowly add the buttermilk, milk, and vanilla.
Whip the egg whites in a third bowl until stiff (but not dry). Add the dry ingredients to the buttermilk mixture and blend until everything is moist and lumpy. (Do not overmix—this is very important for tender pancakes.) Fold in the whipped egg whites with a rubber spatula until blended. (Small specks of egg white are good).
Let the batter rest for 20 minutes.
On a lightly oiled griddle, pour one ladle of batter and spread lightly.
Sprinkle a small amount of blueberries on top and cook until the underside is light brown.
Flip and cook until the other side is light brown.
Keep all pancakes warm in a 200ºF oven until ready to serve.
Enjoy with Blueberry Cream (see the following recipe), butter, and maple syrup, if desired.
Blueberry Cream
Ingredients:
4 ounces cream cheese
1/2 cup blueberries
1/4 cup Pastry Cream (see the following recipe) or vanilla instant pudding
1/4 teaspoon salt
2 tablespoons sugar
Preparation:
- Combine ingredients.
- Beat until light.
Pastry Cream
Ingredients:
4 tablespoons sugar
2 tablespoons plus 1 teaspoon cornstarch
1 cup milk
1 egg yolk
1 egg, whole
1/2 teaspoon vanilla extract
2 tablespoons butter
Preparation:
- Beat sugar, cornstarch, egg, and vanilla.
- Bring milk to a boil, then add to the egg mixture.
- Boil and whip until thick.
- Add the butter and place plastic wrap on top until cooled.
Serves 8.
Labels: Bed Bath and Beyond, Brunch, Recipe
Posted by Lys ::
4:18 AM ::
0 comments
Post / Read Comments
---------------oOo---------------
Wednesday, July 9, 2008
Fast & Fresh: Grilled Chicken and Corn Salad...
 I'm a sucker for corn, especially when it is during the hot summer months. Couple that with some grilled chicken and a curry dressing, I'm game.
So you can guess what will be on the menu this weekend...
~~~~~~~~~~~~~~~~~~~~~~~~~~~~~~~~~~~~~~~~~~~~~~~~~~~~~~~~~~~~~~~~~
GRILLED CHICKEN & CORN SALAD
Recipe [and photo] courtesy of Cooking Club of America
DRESSING
3 tablespoons olive oil
1 1/2 tablespoons reduced-fat mayonnaise
1 tablespoon lemon juice
1 1/2 teaspoons Dijon mustard
1 teaspoon curry powder
1/2 teaspoon minced garlic
1/4 teaspoon salt
1/4 teaspoon freshly ground pepper
SALAD
2 boneless skinless chicken breast halves
2 ears corn, husks and silk removed
2 green onions, thinly sliced
3 cups loosely packed baby spinach
- In small bowl, whisk together all dressing ingredients. Reserve 3 tablespoons of the dressing.
- Heat grill. Brush chicken and corn with reserved dressing. Place chicken and corn on gas grill over medium heat or on charcoal grill 4 to 6 inches from medium coals; cover grill. Grill corn 6 to 8 minutes or until lightly browned and tender, turning to brown all sides. Grill chicken 8 to 10 minutes or until no longer pink in center, turning once.
- Place on cutting board; cool 5 minutes. Slice kernels off corn; slice chicken into strips. In large bowl, toss together corn, green onions and spinach; top with chicken. Drizzle with dressing.
Makes 2 (1 3/4-cup) servings
Labels: Cooking Club, Recipe, Salad, Seasonal
Posted by Lys ::
6:13 PM ::
3 comments
Post / Read Comments
---------------oOo---------------
Saturday, July 5, 2008
Tried & True: G. Garvin's Stuffed Pork Chops With Ricotta and Spinach...
This recipe is one that never fails to garner some rave reviews. G. Garvin's show on TV-One, Turn Up The Heat, was one of the first ones to give me some inspiration to pick up the spatula again. I highly recommend his cookbooks, Turn Up The Heat with G. Garvin and Make It Super Simple if you are looking for some fabu recipes.
~~~~~~~~~~~~~~~~~~~~~~~~~~~~~~~~~~~~~~~~~~~~~~~~~~~~~~~~~~~~~~~~~~~~~~~~~~
Stuffed Pork Chops with Ricotta and Spinach
Recipe courtesy of G. Garvin - Turn Up The Heat
Ingredients:
2 tablespoons unsalted butter
1/4 cup + 3 tablespoons olive oil
4 teaspoons chopped garlic
4 teaspoons chopped shallot
16 ounces spinach
2 teaspoons salt
2 teaspoons black pepper
1/3 cup grated Parmesan cheese
1/4 cup ricotta cheese
4 bone-in pork chops (at least 1-1/2 inches thick)
Wooden toothpicks
- Preheat oven to 350°F.
- In a sauté pan melt butter and 1 tablespoon of oil over medium-high heat. Add 2 teaspoons each of garlic and shallot; sauté until soft. Toss in the spinach; cook until wilted. Remove from pan to a bowl and let cool.
- Finely chop spinach; return to bowl. Add 1 teaspoon each salt and pepper, the remaining garlic and shallot, and the Parmesan and ricotta cheeses; mix well.
- Season chops on both sides with remaining salt and pepper; pat seasonings into meat.
- In a sauté pan heat 1/4 cup of the oil over medium-high heat. Brown chops on both sides in hot oil until golden brown. Remove from pan.
- Lay chops on their bone sides and cut down the middle of the meat sides.
- Open chops and stuff with spinach mixture.
- Close chops; use toothpicks to hold sides together.
- Tuck spinach back in with a fork, if necessary.
- Coat a baking sheet with the remaining 2 tablespoons olive oil. Place chops on prepared baking sheet.
- Bake for 25 to 30 minutes or until cooked well.
Labels: G. Garvin, Recipe, Tried and True
Posted by Lys ::
11:35 PM ::
4 comments
Post / Read Comments
---------------oOo---------------
Wednesday, May 28, 2008
Tried & True: Cherry Clafouti
 Here's what is on the agenda this week at the Lys' household - Cherry Clafouti
 I've had good success making this, both as individual clafoutis and as one big clafouti. Want to achieve heights of nirvana - serve it with a scoop of vanillla or pistachio ice cream.
You can make a clafouti with mostly any fruit but since I saw some gorgeous cherries at the Fresh Market this week, I'm going to use those. I've also been able to use thawed frozen berries, cherries, etc. Whatever I have on hand, I can pull it off. So yes, this recipe is one of my "Tried & Trues."
Why don't you make something special this weekend. I guaratee you will have people clamoring for more:
~~~~~~~~~~~~~~~~~~~~~~~~~~~~~~~~~~~~~~~~~~~~~~~~
Cherry Clafoutis
Recipe courtesy of Emeril Lagasse
4 eggs
1 cup sugar
1 vanilla bean, split in half
1 tablespoon brandy
1 cup flour
1 1/2 cups milk
1 pound stoned cherries
Preheat the oven to 350 degrees F. Grease an oval ovenproof dish about 13 inches long. In a mixing bowl, whisk the eggs and 1/2 cup of the sugar. Scrape the vanilla bean and add the pulp to the egg mixture. Stir in the brandy and flour. Whisk in the milk to form a smooth batter. In a mixing bowl, toss the cherries with the remaining sugar. Place the cherries in the ovenproof dish. Pour the batter over the cherries and place in the oven. Bake for 40 to 45 minutes or until the cake is sponge like. Remove from the oven and cool for 5 minutes before serving. Serve the clafoutis warm. Garnish with powdered sugar.
Labels: Desserts, Recipe, Tried and True
Posted by Lys ::
7:44 AM ::
3 comments
Post / Read Comments
---------------oOo---------------
Wednesday, April 9, 2008
Tried & True: Herbed Baked Eggs
This is one of those recipes that I love to make for a light dinner or a fabulous breakfast. What is it they say - eggs are good anytime?
Trust me when I say, once you try it - it will be one of your favorite go-to recipes.
~~~~~~~~~~~~~~~~~~~~~~~~~~~~~~~~~~~~~~~~~~
Herbed Baked Eggs [Recipe Courtesy of The Barefoot Contessa]
Ingredients:
1/4 teaspoon minced fresh garlic
1/4 teaspoon minced fresh thyme leaves
1/4 teaspoon minced fresh rosemary leaves
1 tablespoon minced fresh parsley
1 tablespoon freshly grated Parmesan
6 extra-large eggs
2 tablespoons heavy cream
1 tablespoon unsalted butter
Kosher salt and freshly ground black pepper
Toasted French bread or brioche, for serving
- Preheat the broiler for 5 minutes and place the oven rack 6 inches below the heat.
- Combine the garlic, thyme, rosemary, parsley, and Parmesan and set aside.
- Carefully crack 3 eggs into each of 2 small bowls or teacups (you won't be baking them in these) without breaking the yolks. (It's very important to have all the eggs ready to go before you start cooking.)
- Place 2 individual gratin dishes on a baking sheet.
- Place 1 tablespoon of cream and 1/2 tablespoon of butter in each dish and place under the broiler for about 3 minutes, until hot and bubbly.
- Quickly, but carefully, pour 3 eggs into each gratin dish and sprinkle evenly with the herb mixture, then sprinkle liberally with salt and pepper.
- Place back under the broiler for 5 to 6 minutes, until the whites of the eggs are almost cooked. (Rotate the baking sheet once if they aren't cooking evenly.) The eggs will continue to cook after you take them out of the oven.
- Allow to set for 60 seconds and serve hot with toasted bread.
Labels: Barefoot Contessa, Eggs, Food Network, Recipe, Tried and True
Posted by Lys ::
11:02 PM ::
0 comments
Post / Read Comments
---------------oOo---------------
Saturday, March 22, 2008
Tried & True: Broiled Salmon with Herb Mustard Glaze
One of the favorites that my father always requests when he visits is Broiled Salmon with Herb Mustard Glaze. It's super simple and fabulous. The fresh herbs add a kick and I tend to also use a bit more of whole grain mustard as well.
Enjoy!
~~~~~~~~~~~~~~~~~~~~~~~~~~~~~~~~~~~~~~~~~~~~~~
Broiled Salmon with Herb Mustard Glaze [Recipe courtesy of Giada de Laurentiis]
Ingredients:
2 garlic cloves
3/4 teaspoon finely chopped fresh rosemary leaves
3/4 teaspoon finely chopped fresh thyme leaves
1 tablespoon dry white wine
1 tablespoon extra-virgin olive oil
2 tablespoons Dijon mustard
2 tablespoons whole-grain mustard
Nonstick olive oil cooking spray
6 (6 to 8-ounce) salmon fillets
Salt and freshly ground black pepper
6 lemon wedges
- In a mini food processor, combine garlic, rosemary, thyme, wine, oil, Dijon mustard, and 1 tablespoon of whole-grain mustard.
- Grind the mustard sauce until combined, about 30 seconds.
- Transfer to a small bowl.
- Add remaining 1 tablespoon of whole-grain mustard to the sauce and stir to combine.
- Set aside mustard sauce.
- Preheat the broiler.
- Line a heavy rimmed baking sheet with foil.
- Spray the foil with nonstick spray.
- Arrange the salmon fillets on the baking sheet and sprinkle them with salt and pepper.
- Broil for 2 minutes.
- Spoon the mustard sauce over the fillets.
- Continue broiling until the fillets are just cooked through and golden brown, about 5 minutes longer.
- Transfer the fillets to plates and serve with lemon wedges.
Labels: Fish, Giada de Laurentiis, Recipe
Posted by Lys ::
9:42 PM ::
0 comments
Post / Read Comments
---------------oOo---------------
Monday, March 10, 2008
Tried & True: Baked Cheese Crepes...
I saw this recipe on Everyday Italian and HAD to try it. It's one of my "go to" recipes that works great when I'm having someone over for dinner or just feel the need for something really comfort-y. It takes a bit of practice to make the crepes but any mistakes or oops can be covered by the sauce (which is my saving grace, let me tell ya). Next time I make it, I will definitely post a picture.
Enjoy!
~~~~~~~~~~~~~~~~~~~~~~~~~~~~~~~~~~~~~~~~~~~~~~~~~~~~~~~
Baked Cheese Crepes [Recipe courtesy Giada De Laurentiis]
Ingredients
6 large eggs
1/3 cup whole milk
1/2 teaspoon salt
1/4 teaspoon freshly ground black pepper
4 tablespoons (about) unsalted butter
8 ounces fontina cheese, cut into 1/2-inch cubes
8 ounces fresh water-packed mozzarella, drained, cut into 1/2-inch cubes
1/4 cup thinly sliced fresh basil leaves
1 cup Marinara Sauce
1/4 cup freshly grated Parmesan
Whisk the eggs, milk, salt, and pepper in a medium bowl.
Heat a 6-inch nonstick skillet over medium-low heat.
Brush the skillet with some butter.
Working quickly, pour 3 tablespoons of the egg mixture into the pan, swirling to coat the bottom of the pan evenly.
Cover and cook until the egg crepe is just set, about 1 minute.
Invert the skillet over a plate, and allow the egg crepe to drop onto the plate.
Repeat to make 10 crepes total, brushing the skillet with melted butter as needed and stacking crepes on the plate.
Preheat the oven to 400 degrees F.
Butter a 13 by 9 by 2-inch baking dish.
Arrange 1 egg crepe on a work surface.
Place some of the fontina and mozzarella cheese in the center of the egg crepe, then sprinkle with some basil.
Roll up the crepe.
Place the filled crepe in the prepared baking dish, seam side down.
Repeat with the remaining egg crepes, cheese, and basil.
Spoon the marinara sauce over the crepes.
Sprinkle with the Parmesan and dot with 2 tablespoons of butter.
Bake until the cheese melts and the top is golden, about 15 minutes.
Labels: Giada de Laurentiis, Italian, Recipe
Posted by Lys ::
4:29 PM ::
0 comments
Post / Read Comments
---------------oOo---------------
Saturday, March 8, 2008
Comfort, Southwestern Style...
 One thing I always have in my pantry are organic chicken stock, beans (black or cannelini) and salsa. That way I can always make my favorite Southwestern Chicken Soup.
I have to say that I'm spoiled. When I have tortilla or southwest chicken soup at various places, I always think "mine's better" because mine is always different each time around and allows for adaptation.
I first got wind of the Southwestern Chicken Soup recipe courtesy of Grown Up Girlie and when I make a batch, I always make sure that there will be extra for lunch or dinner during the week. I adapted the recipe from Real Simple (where the photo is from because I was too hungry to take pictures) and this recipe kicks butt time and time again...
Southwestern Chicken Soup (adapted from Real Simple)
1 12-ounce jar salsa verde
3 cups cooked chicken pieces (1 small deli-counter rotisserie chicken or leftovers)
1 15-ounce can cannellini or black beans, drained
3 cups chicken broth
1 teaspoon ground cumin (optional)
Pinch of Cayenne (optional)
1 small yellow onion, sauteed
1/2 cup sour cream
Tortilla chips (optional)
Shredded cheddar cheese (optional)
Spritz of lime juice (optional)
- Dice the onion and saute in olive oil
- Empty the salsa into a large saucepan.
- Cook 2 minutes over medium-high heat, then add the chicken, beans, broth, and, if desired, lime juice, cayenne and cumin.
- Bring to a boil, lower heat to a simmer, and cook for 10 minutes, stirring occasionally.
- Top each bowl with a sprinkling of cheese, a dollop of sour cream, and some tortilla chips (if desired). For a soupier dish, use 4 cups of broth.
Can't go wrong with Chicken soup when you are looking for a bit of comfort-y goodness. Buon apetito!
Labels: Comfort Food, Recipe, Soup
Posted by Lys ::
9:26 PM ::
0 comments
Post / Read Comments
---------------oOo---------------


 Subscribe in a reader


 This is one of those recipes I go to when I want to put a little oomph in my step. Now, this in NO way means I'm abandoning my fave Barefoot Contessa BBQ Sauce, but this is good for when you want a little somethin' different.
  In this week's Cuisine Beyond segment of the Bed, Bath & Beyond newsletter, Chef Ryan Scott has a fabulous recipe that merits a second look: Soufflé Blueberry Pancakes with Blueberry Cream Topping.
  I'm a sucker for corn, especially when it is during the hot summer months. Couple that with some grilled chicken and a curry dressing, I'm game.
  Here's what is on the agenda this week at the Lys' household - Cherry Clafouti
  One thing I always have in my pantry are organic chicken stock, beans (black or cannelini) and salsa. That way I can always make my favorite Southwestern Chicken Soup.